Transcript
00:00
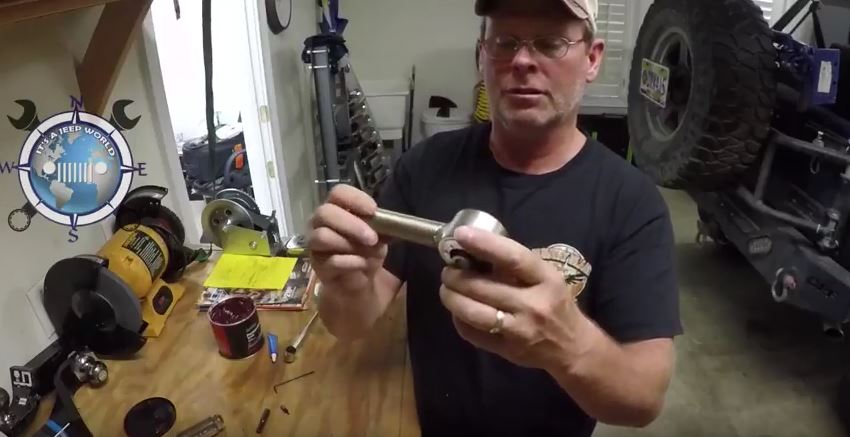
all right so what we got is tonight I’m
00:04
putting together a iron rock off-road
00:09
adjustable track bar with a flex there
00:14
flex joint which looks like this
00:20
typical 14 millimeter hole for the JK
00:25
track bar front and rear plastic combs
00:30
that the Flex joint fits into and eight
00:37
332nd allen screws that will tie
00:42
everything together in the end
00:46
I have red loctite for the end of the
00:51
screws to keep them in place I’ve got
00:53
some premium heavy-duty bearing grease
00:56
to lightly coat the inside races and the
00:59
ball of the Flex joint and I have a 3/32
01:03
quarter inch drive allen allen head so
01:11
that I can properly torque the little
01:15
screws to 20 inch pounds it’s a pretty
01:19
simple process from reading the
01:21
instructions what I have handy right
01:24
here simple
01:29
first it says to verify the fitment
01:33
verify the fitment / the fitment section
01:39
which I’ve already done and they’re
01:41
talking about if you’re running a
01:42
another different track bar then a
01:45
different iron rock track Marvel this is
01:49
the only rock track bar that I’ve had so
01:51
so then I insert the four socket head
01:53
cap screws into one end of the race race
01:56
should have a spherical bore facing away
01:59
from the end cap which that would be
02:04
this is the end cap this is the race and
02:09
there’s a spherical Center and you just
02:14
put the four screws through that to make
02:19
one side of the assembly with a
02:22
spherical facing inward which that’s
02:26
what the ball is gonna ride on then it
02:30
says install a small assembly into the
02:34
track bar outer bushing tube the races
02:38
are a light depressed bit use a wide
02:40
punch or hammer to assist you if needed
02:43
so I’m gonna put it in here
02:49
as such
02:58
and I didn’t need a hammer it just slid
03:00
right in tight it wasn’t an easy fit and
03:04
what this didn’t slide in okay next step
03:12
apply a thin coat of multi-purpose
03:14
grease to the ball and the Sevierville
03:16
mating surface of the races coat both
03:18
mating surfaces they leave no excess
03:21
grease that would interfere with the
03:23
threadlocker
03:24
adhesive on the bolts so we’ll take a
03:28
little dab a little dab we’ll put it on
03:32
the inside race
03:42
it has a nice clean surface to ride on
03:47
and we’ll also put some on the ball
03:51
itself doesn’t need much there’s not a
03:55
whole lot of room in there it just needs
03:58
something to give it that sleep
04:09
right
04:12
that’s nice and lubed up he’s peasy next
04:20
place the ball into the race in the
04:23
housing the ball should fit the contour
04:25
the race perfectly insert the other race
04:27
on top of the ball before I do that I’m
04:32
going to lube off the other race
04:57
put that race in here
05:01
it’s like I set the other one up
05:07
put the ball inside
05:16
slide them all together
05:22
a lot of moving parts going on right now
05:24
because you’ve got a slide you’ve got a
05:27
slide the mating surface together you
05:29
got eight screws that you don’t want to
05:34
fall out
05:49
all right
05:52
we had the joint
05:55
voila
06:00
before I
06:01
before I tighten anything up I guess I
06:04
should put threadlocker on
06:13
so we’ll go ahead and do that first on
06:16
this side
06:42
okay
06:47
dabbe
06:49
red loctite on each end
06:54
will suffice
07:00
slide that and
07:05
let’s read started
07:08
and that long
07:33
nothing ever goes as planned come on son
07:37
didn’t go wrong and it wouldn’t be me
07:45
at least I think wrinkle that crap now
07:47
until it was tight alright put that side
07:52
pop these out since I’ve never started
07:55
the threads a little bit on each side of
07:58
these then we’ll be golden
08:18
20 inch pounds it says crank these down
08:22
to once I get the thread tight on thread
08:25
thread Locker on it
08:32
it’s getting pretty good overall he’s
08:34
got the both the front and rear track
08:37
bar adjustable from iron rock and upper
08:42
and lower control arms with the flex
08:44
joints from iron rock and deutsche
08:46
deutsch tech prerunner 6-inch lift
08:54
hydraulic shocks as well
09:08
all right now I can
09:15
even these all out
09:36
I don’t wanna even I want to get them
09:38
too tight because as we know 20 inch
09:40
pounds isn’t a whole lot
09:48
I just want to get those surfaces all
09:51
flush
09:57
and I can go through with the torque
10:01
wrench and put them to the correct
10:04
torque my rock says that the Flex joint
10:08
should move stiffly once it’s together
10:27
that’s pretty stiff so now we’re gonna
10:31
crank it down to 20 inch pounds
11:06
so
11:10
now that I can get it to 20
11:32
she just got the I guess you’re just
11:34
gonna have to watch the whole process
11:39
that’s ten
12:12
that’s 20
12:15
so I did five ten and then
12:30
and I’m going crisscross as well I’m not
12:33
just going around the horn
12:45
too much fun
12:56
all right that’s one side
12:58
talk to 20
13:02
you don’t decide
13:22
bear with me I don’t do these videos
13:24
very often so
13:25
select my first one
13:30
it might be crap but you know what it’s
13:32
mine
13:47
you can learn right along with me
14:14
right that’s 20 on all of them
14:18
let’s go back and double check to make
14:19
sure
14:43
yep
14:50
work
14:55
now the other side
15:21
their turn a little bit more because
15:25
back and forth it’s gonna
15:28
I did one side is going to tighten
15:30
listen the other side
15:38
got 20 on all four of these
15:44
but back to the other side and make sure
15:46
they’re still at 20
15:52
yep
16:08
deep
16:15
all right
16:19
one more time
16:24
movement 20
16:31
20
16:38
20
16:43
no movement 20
16:46
that should be 20 solid 20 all of them
16:52
no additional movement once I go back to
16:55
the other side
17:02
they should be good
17:05
20 inch pounds for the iron rock
17:08
instructions
17:17
all right
17:21
now what it says
17:26
install the second end cap we did that
17:28
inside a little less to make sure
17:30
they’re snug you know talk to sequences
17:32
crisscross I just did that like talking
17:34
lug nuts taken to all eight evenly in
17:37
small snip so did that take your time do
17:40
not tighten
17:44
take your time do not rush tighten all
17:47
eight screws to twenty inch pounds and
17:49
that’s what I did
17:55
and it is pretty firm
17:57
as they said it would be
18:13
so I need a screwdriver
18:15
which of course I don’t have
18:20
I’ll bareback
18:35
all right
18:37
so are these constructions it says
18:49
the ball should pivot smoothly with even
18:52
resistent in any
18:54
position it should require a tool such
18:57
as a screwdriver to pivot or rotate them
18:59
all screwdriver
19:12
rotates good and that in all the
19:14
direction
19:27
I like it
19:32
one done all rock off rolls out of where
19:38
you guys oughta just outside of
19:40
Minneapolis Minnesota create little
19:47
off-road company they got someone to
19:49
stone us to the soda stuff that is out
19:52
on the market and that’s why I went with
19:54
them so that’s my first track arm track
20:00
bar adjustable end with their flex joint
20:05
I’ll do the other one and you’ll get to
20:08
watch because I’ve already made enough
20:10
of a fool myself so peace